 Script Planner Assistant▸
 AI Apps
 AI News
Gnomic Agent Creation Tutorial Guide
小编 ·

Gnomic Agent Creation Tutorial Guide
Log in to the Gnomic Agent platform (https://www.gnomic.cn/), click the [Create] button in the left navigation bar (or the [Create] button to the left of the avatar) to open the agent creation page, and create your own agent without code~
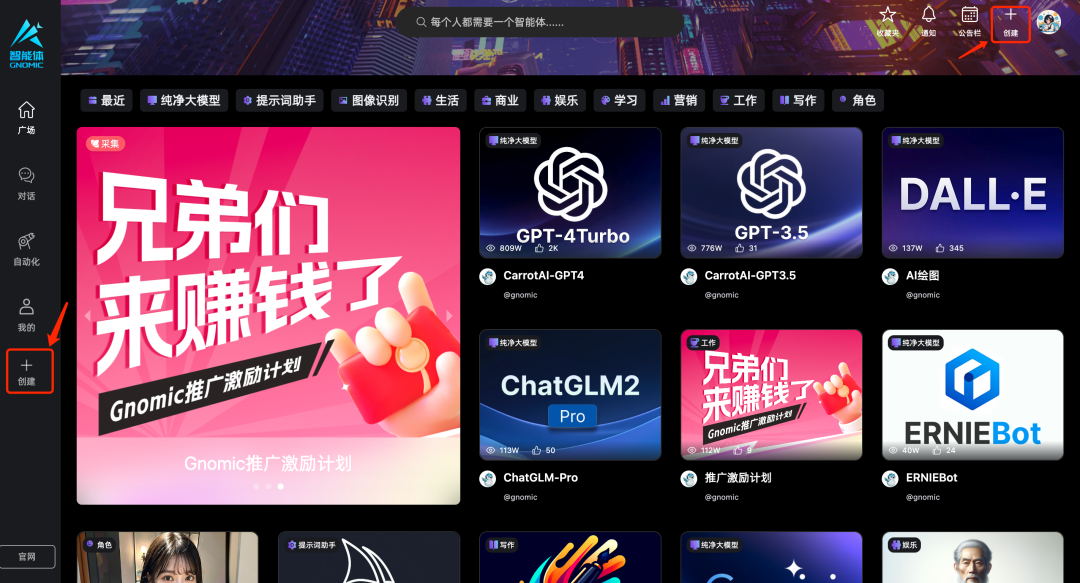
Agents are intelligent entities powered by LLMs that are capable of proactive thinking and action. You can choose one of the following suitable methods to create an agent.
I. Create via Conversation
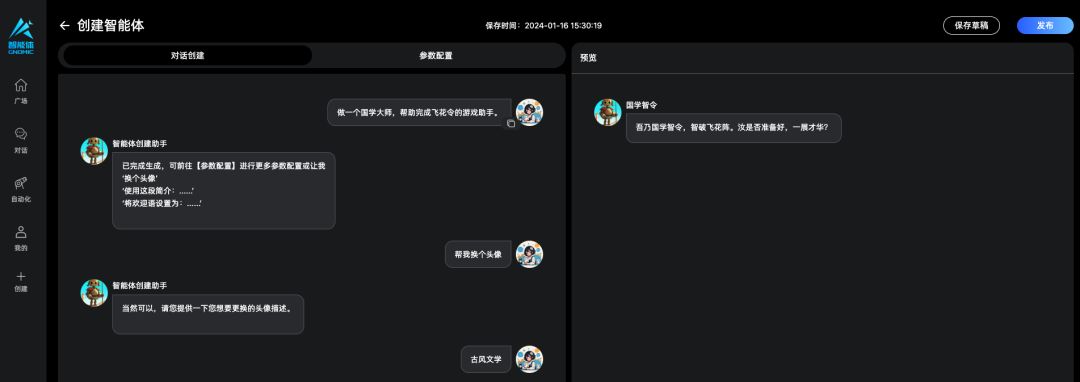
1. The process of creating an agent is just like having a conversation with one. The agent creation assistant will ask you about your desired operating mode for this agent.
For example, users can enter in the input box "Create a Chinese studies master to help complete the Flying Flower Order game assistant." The agent creation assistant will provide feedback accordingly.
2. After receiving your input, the agent creation assistant begins to guide the agent creation step by step, including recommending a name and designing an avatar to represent the agent.
3. Subsequently, the agent creation assistant will ask a series of questions to further optimize the agent.
For example, it will ask "Go to [Parameter Configuration] for more parameter settings or let me 'change the avatar'." Such interaction enables users to continuously optimize and improve the agent's design.
4. During the agent creation process, you can use the conversation interface on the right at any time for real-time testing and preview. The left side is used to configure the agent, and the right side is used to input information. After saving the parameters, the agent will respond immediately.
5. You can also make adjustments directly on the [Parameter Configuration] page.
II. Direct Creation via [Parameter Configuration]
Create an agent by editing prompts to express intent, provide behavioral instructions, and introduce capabilities such as knowledge bases and tools.
Step 1: How to fill in the image and name?
The avatar should be related to the theme, and the more attractive it is, the more people will come to use it.
The agent name should be a high-level summary of the agent's functionality.
Step 2: Key points!! How to write the prompt?
If you want the model to complete a certain task, you need to give it specific prompts. The prompt directly determines the effectiveness of the agent you create.
The simplest formula is: the role you want the agent to play + what kind of result you hope it will generate based on what kind of user input + detailed requirements for the content generated by the agent.
Note:
Reduce vague expressions and clearly state your needs.
Keep the pronouns in your instructions consistent and avoid switching back and forth, as this may cause the large model to be confused.
Try to avoid using industry jargon in your instructions, as this may cause comprehension barriers for the AI large model.
Step 3: How to write the greeting?
The opening line will be displayed when users first open your agent. Write a short and interesting self-introduction for your agent in a first-person, anthropomorphic tone~
Step 4: How to write the agent introduction?
The introduction will be displayed on your agent's homepage. It is recommended to introduce the agent's functions and usage scenarios.
Step 5: How to choose other content?
1. Tag selection: Choose a suitable tag for your agent.
2. Large model selection: Choose an appropriate large model based on different uses.
Step 6: Start the experience
Click [Save Parameters] to start testing the agent's effectiveness! After completing the above steps, click [Publish] to successfully create your own agent.
If you are not satisfied with the test results, you can optimize them on the left, save the parameters again, and refresh to test; if the test results are satisfactory, you can prepare for publishing~ After completing the above steps, click [Publish] to successfully create your own agent!