
 Script Planner Assistant▸
 AI Apps
 AI News
How to Deploy DeepSeek Janus Pro Locally?
小编 ·

How to Deploy DeepSeek Janus Pro Locally?
Janus-Pro-7B released by DeepSeek is an open-source multimodal large model that supports image recognition and generation, with performance surpassing Openai's DALL·E 3. Below are detailed steps, tips, and notes for how to deploy DeepSeek Janus Pro-7B locally:
I. Environment Preparation
Hardware Requirements
GPU: VRAM ≥24GB (recommended NVIDIA RTX A6000 or higher performance graphics card); if VRAM is insufficient, you can try low-precision mode (model.half()) or reduce generation parameters.
Storage: ≥30GB available space (model files are about 20GB+).
Operating System: Ubuntu 20.04+ or Windows recommended (requires CUDA adaptation).
Python: 3.8+, recommended to use Conda to manage virtual environments.
Software Dependencies
CUDA: 11.7+ (must match the PyTorch version).
PyTorch: specified version torch==2.0.1+cu117 (must be installed via the official index).
Other tools: Git, HuggingFace Hub download tool (huggingface-cli).
II. Deployment Steps
1. Clone the repository
git clone https://github.com/deepseek-ai/Janus.git
cd Janus
2. Create a virtual environment
conda create -n janus python=3.8 -y
conda activate janus
3. Install dependencies
pip install torch==2.0.1+cu117 --index-url https://download.pytorch.org/whl/cu117
pip install -r requirements.txt
pip install -e .[gradio]  # Install Gradio extension
4. Download the model
Method 1: Download the full model via huggingface-cli (recommended for domestic users to use the mirror for acceleration):
HF_ENDPOINT=https://hf-mirror.com huggingface-cli download deepseek-ai/Janus-Pro-7B \
  --local-dir ./models/Janus-Pro-7B \
  --resume-download --cache-dir ./cache
Method 2: Manually download the model files from the HuggingFace repository and extract them to ./models/Janus-Pro-7B.
5. Launch the application
Text interaction interface:
python demo/app_text.py --model-path ./models/Janus-Pro-7B
Multimodal interface (supports image generation and Q&A):
python demo/app_multimodal.py --model-path ./models/Janus-Pro-7B --port 7860
Access http://localhost:7860 or http://127.0.0.1:7860 to use the interaction interface.
III. Feature Usage Examples
Text-to-Image
from janus.utils import generate_image
generate_image(
    model_path="./models/Janus-Pro-7B",
    prompt="夕阳下的雪山,山脚下有蓝色的湖泊",
    output_dir="./outputs",
    num_images=4  # Generate 4 images)
Multimodal Q&A (Visual QA)
from janus.models import MultiModalityCausalLM, VLChatProcessor
processor = VLChatProcessor.from_pretrained("./models/Janus-Pro-7B")
model = MultiModalityCausalLM.from_pretrained("./models/Janus-Pro-7B").to("cuda")
# Input conversation and image path
conversation = [
    {"role": "", "content": "描述这张图片的内容", "images": ["sample.jpg"]},
    {"role": "", "content": ""}
]
inputs = processor(conversations=conversation)
outputs = model.generate(**inputs)
print(processor.decode(outputs[0]))
IV. Common Issues and Optimization
Insufficient VRAM
Reduce generation parameters: max_new_tokens=256.
Enable low-precision mode: model = model.half().
Slow download speed
Use a domestic mirror source: HF_ENDPOINT=https://hf-mirror.com.
Enable multi-threaded download: --workers 8.
Dependency conflicts
Strictly install the specified version:
pip install transformers==4.33.2
Image generation quality optimization
Adjust CFG weight (within the 5-7 range).
Increase parallel sampling quantity: parallel_size=16.
Here I also share a local deployment method from a technician I follow on X:Tip 1: If you have already installed the conda pytorch environment before, you can use conda create --name myenv --clone base to clone it directly, otherwise you have to redownload pytorch every time, which is slow and wastes time.
Tip 2: You must install flash-attention. Although it can run without it, VRAM will explode. Those with an A100 can ignore this.
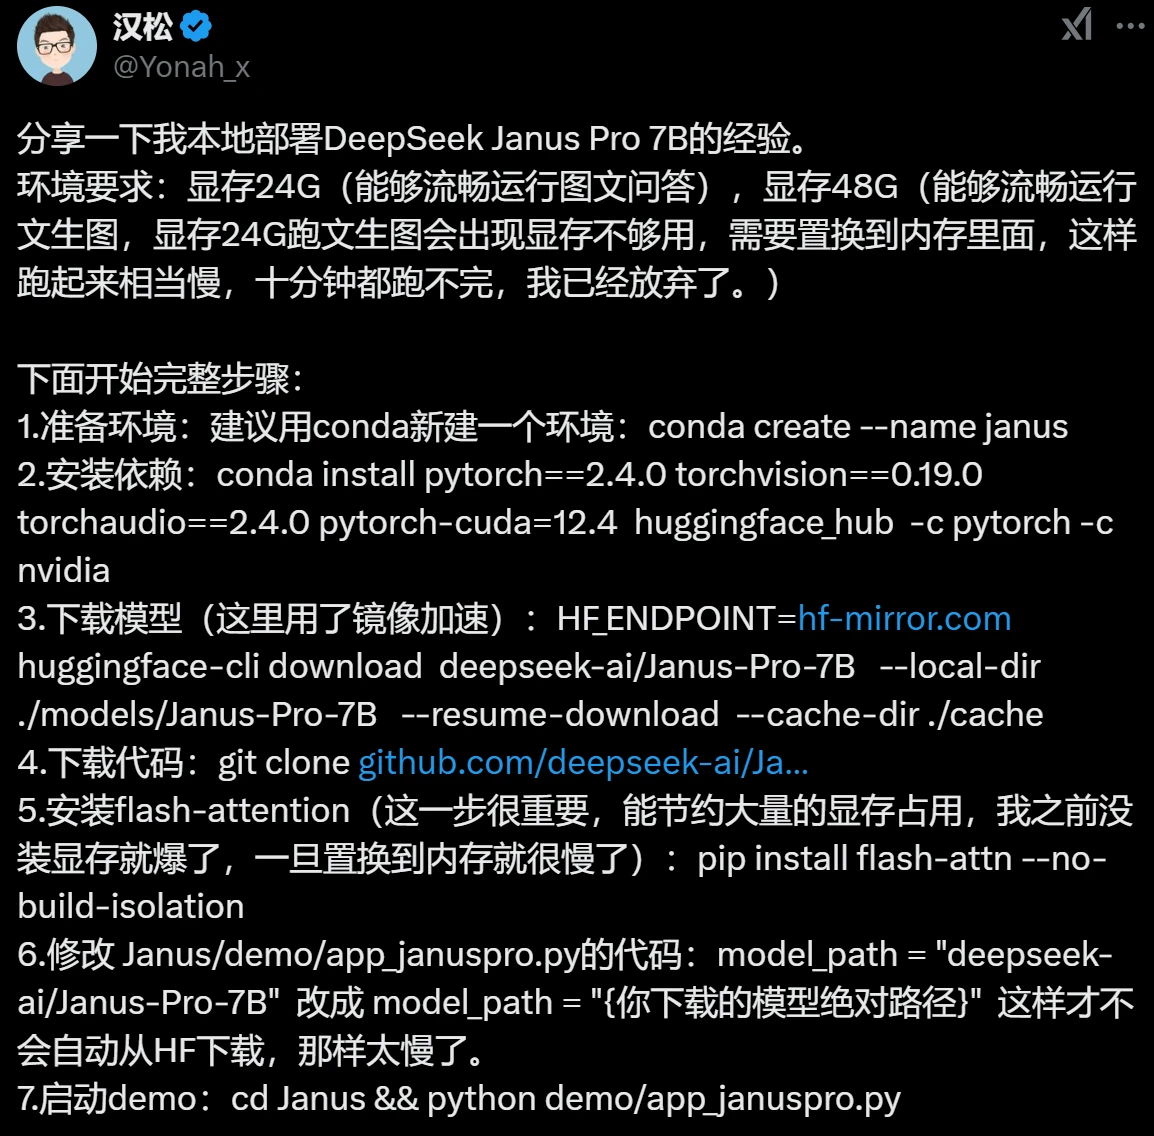
Tips:
Through the above steps, you can quickly deploy and experience the multimodal capabilities of Janus-Pro-7B locally. For further optimization or to learn about model details, please refer to the GitHub repository and technical documentation.